Christine's Recipes: Easy Chinese Recipes | Delicious Recipes

Banana Cake Recipe

by · 44 comments

This classic moist banana cake recipe brings out the best in ripe bananas, delivering a soft, aromatic slice that pairs wonderfully with your morning coffee or afternoon tea.


Banana Cake

Whether you need a quick homemade bake or want to make good use of extra ripe fruit, this quick banana loaf comes together effortlessly in one bowl to nourish your family with wholesome comfort.


I first learned to bake by making a banana cake. It’s a great starting point for anyone looking to get into baking.


Why You'll Love This Recipe

  • Effortless prep work: Simple ingredients combine in minutes using basic kitchen tools without complicated steps.
  • Incredibly soft texture: Gentle hand-mixing ensures a light, moist crumb every single time.
  • Naturally rich flavour: Ripe bananas provide natural sweetness and deep, comforting bakery-style taste.
Banana Cake Procedures

Key Tips for Success

  • Use ripe bananas: Fully speckled bananas yield the most moisture and natural sweetness for your batter.
  • Avoid over-mixing batter: Fold flour gently using a spoon or spatula to maintain a tender, soft crumb.
  • Adjust milk quantity: Add milk gradually to achieve a smooth, workable batter consistency before baking.


Banana Cake Recipe

(Printable recipe)
Course: Banana, Fruit, Bakery
Cuisine: Western
Prep time:
Cook time:
Yield: one baking pan, sized 11.5cmx22cmx6cm

Banana Cake

Ingredients:
  • 1 1/2 cups plain flour
  • 250 4 ripe bananas
  • 1/3 cup unsalted butter, melted
  • 3/4 cup sugar, white or brown (if you like darker colour, use brown)
  • 1 egg, whisked
  • 1 tsp vanilla extract
  • 1 tsp baking soda
  • 1/8 tsp salt
  • 1/4 cup milk (or 1/2 cup, depending on the thickness of the batter)
Method :
  1. Preheat oven to 175C (350F).
  2. Smashed the ripe bananas in a large bowl with a spoon or process in a food processor. Use a wooden spoon or spatula to combine melted butter with the smashed bananas. Stir in sugar, whisked egg and vanilla. Add 1/4 cup of the milk first, then combine well. If the batter is too thick, add more and adjust the amount as you go.
  3. Sprinkle the baking soda and salt in the mixture. Stir in sifted flour, one third at a time. No need to stir too hard, just fold and incorporate all ingredients thoroughly.
  4. Transfer mixture into a greased baking pan. Bake for about 1 hour. Test with a needle. If it comes out clean, the cake is cooked through. Remove from oven and let cool on a rack. Enjoy!
Notes:
  • If you feel too tired of smashing banana with a spoon, use a food processor. Just process bananas for a few seconds if you’d like to retain some texture.
  • I found it’s better not to use an electric mixer for making banana cake. Use a spoon or whisk just to incorporate all ingredients together without over-stirring. The cake would be turned out really soft.
Read More

Pandan Snow Skin Mooncakes with Coconut Mung Bean Filling

by · 72 comments

Making homemade pandan snow skin mooncakes is a wonderful way to celebrate the Mid-Autumn Festival with a fresh, aromatic twist on traditional festive treats. Blending natural pandan juice with soft snow skin dough and sweet coconut mung bean filling creates a gorgeous, restaurant-quality dessert that easily feeds both body and soul.


Mid-Autumn Festival (aka moon festival or mooncake festival, 中秋節) is one of the important festivals in Chinese calendar. I’ve grown up from a family that would have store-brought mooncakes every year. Since I moved to Australia, I’ve been pondering over the idea of making my own mooncakes. After many years, I made some traditional and trendy ones finally.


Pandan Snow Skin Mooncakes with Coconut Mung Bean Filling
Read More

Mung Bean Filling (For Mooncakes)

by · 34 comments

Making your own homemade mung bean filling is the secret to creating exceptionally delicious traditional mooncakes and snow skin mooncakes. Rich, creamy, and infused with coconut milk, this sweet pastry paste offers a velvety texture that elevates any Mid-Autumn Festival treat.


Mung Bean Filling01
Read More

Pandan Chiffon Cake

by · 90 comments

Looking for that iconic, bakery-style Asian chiffon cake with an ultra-airy, pillowy crumb? This classic pandan chiffon cake recipe yields an incredibly soft, cottony-soft crumb infused with the tropical fragrance of fresh pandan leaves and rich coconut milk. It is a timeless family favourite dessert that delivers light-as-air texture every single time, making it ideal for afternoon teas or weekend family gatherings.


Pandan Chiffon Cake01

I originally shared this Asian chiffon cake after watching a Masterchef Australia pressure test episode featuring Dan Hong's famous pandan cake. Sharing delicious food with loved ones is one of life's simplest graces, and baking a fresh, homemade chiffon cake brings warmth and joy to any table.


Why You'll Love This Recipe

  • Cottony-soft texture: Whisked egg whites create a tender, airy structure that stays moist for days.
  • Authentic tropical flavor: Freshly squeezed pandan juice combined with coconut milk offers a delightful natural aroma.
  • Straightforward home baking: Simple techniques make achieving a bakery-quality tube cake completely stress-free.
Pandan Chiffon Cake02

Key Tips for Success

  • Use grease-free utensils: Ensure your mixing bowl and beaters are completely dry and oil-free before whipping egg whites to stiff peaks.
  • Fold delicate batter gently: Fold the meringue in three batches using a light hand to preserve incorporated air.
  • Invert to cool: Immediately invert the ungreased tube pan right out of the oven to prevent the cake structure from collapsing.
Pandan Chiffon Cake02

Frequently Asked Questions

  • Q: Why did my chiffon cake shrink or fall out of the pan?
  • A: Never grease your chiffon tube pan! The batter requires an ungreased surface to climb and cling to as it expands.
Read More

Steamed Chicken with Wood Ears and Dried Lily Buds

by · 22 comments

This classic Cantonese steamed chicken with wood ears and dried lily buds brings back fond memories of childhood comfort food. Delicate cloud ears and sweet lily buds soak up all the rich, savory juices, turning everyday ingredients into an exceptionally nourishing meal.


Steamed Chicken with Wood Ears and Dried Lily Flowers01

Cooking at home is a wonderful way to express care for your family while enjoying wholesome, high-quality living. By balancing savory seasonings with aromatic ginger and dried dates, this dish offers a quick, elegant, and deeply satisfying dinner with minimal prep.


Read More

Bubur Cha Cha (摩摩喳喳)

by · 18 comments

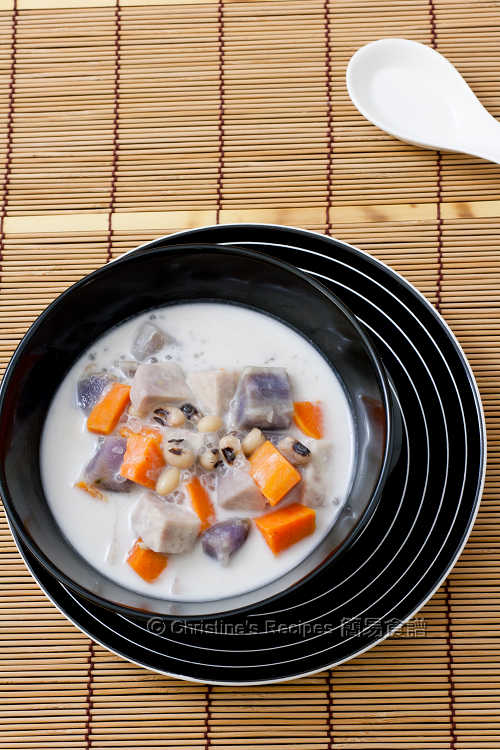
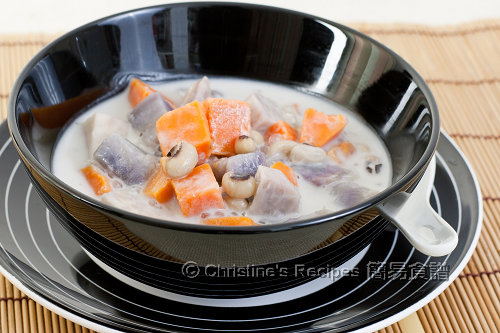
Bubur Cha Cha is a classic Malaysian sweet potato coconut dessert filled with chewy tapioca pearls, tender yam, and fragrant pandan infusion. This colorful comfort food brings warmth to your table and offers a beautiful, nourishing sweet treat to share with loved ones after a satisfying home-cooked meal.


Bubur Cha Cha01

Making this authentic Nyonya dessert at home is a wonderful way to embrace quality living with simple, wholesome ingredients. With its rich coconut soup and medley of soft root vegetables, it satisfies sweet cravings while nourishing both body and mind with wholesome, balanced comfort.


Why You'll Love This Recipe

  • Colorful and Inviting: Combining golden sweet potato, purple sweet potato, and yam creates a visually stunning bowl.
  • Versatile Serving Temperature: Enjoy this dessert soothingly hot on cool days or refreshingly chilled during warmer seasons.
  • Delightful Texture Contrast: Soft root vegetables paired with tender black-eyed beans and springy sago pearls deliver a memorable mouthfeel.
Bubur Cha Cha02

Key Tips for Success

  • Steam Root Vegetables: Steam your sweet potatoes and yam instead of boiling to keep the vibrant purple color from bleeding into your coconut soup.
  • Soak Chopped Potatoes: Place cut sweet potato cubes in a bowl of cold water immediately after dicing to prevent oxidation and discoloration.
  • Residual Heat Cooking: Allow the tapioca pearls to sit covered off the heat after boiling so they cook through to translucent perfection without turning mushy.


Bubur Cha Cha Recipe

(Printable recipe)

Course: Dessert
Cuisine: Chinese, Asian
Prep time:
Cook time:
Yield: 3 to 4 serves

Bubur Cha Cha

Ingredients:
  • 150 gm yam (taro), peeled and diced
  • 150 gm golden sweet potato
  • 150 gm purple sweet potato
  • 50 gm black-eyed beans (black-eyed peas)
  • 50 gm tapioca pearls (sago pearls)
  • 1 liter boiling water, plus more to cook beans and tapioca pearls
  • 120 gm rock sugar or coconut sugar, finely chopped, or to tast
  • 1½ cup coconut cream, or to taste
  • 3 pandan leaves

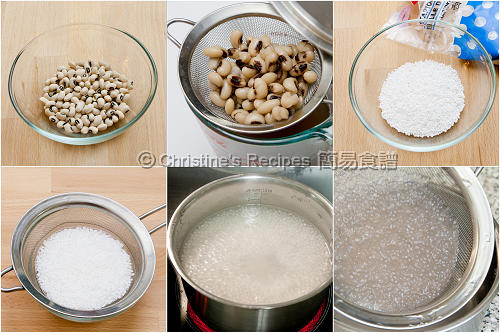
Bubur Cha Cha Procedures01

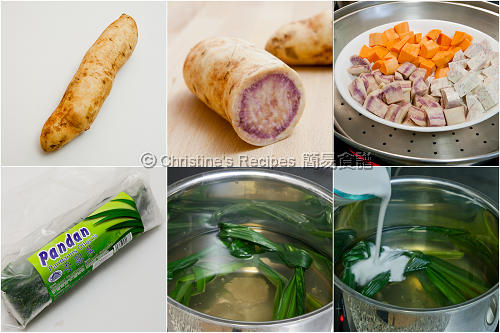
Bubur Cha Cha Procedures02

Method :
  • Rinse the black-eyed beans and drain well. Soak in boiling water with cover for 15 to 20 minutes. Drain and put into a large pot of boiling water. The water should cover the beans up to at least 2 inches. Bring it to boil. Reduce heat to simmer over medium-slow heat until softened, but not mushy, about 20 to 30 minutes. Drain well and set aside.
  • Soak tapioca pearls for 10 minutes. Drain and transfer into a pot of boiling water. Cover and cook over medium heat until it boils again. Immediately remove from heat. Don’t remove the pot lid. Let the residual heat inside to cook for further 10 minutes. Drain through a fine sieve. Rinse with running cold water. Drain well. The tapioca pearls should be translucent and retain their shapes. If some of them still have a white spot in the middle, they are not cooked through completely. It’s fine because you need to cook them with coconut milk later.
  • Steam diced yam, golden and purple sweet potato in a wok over high heat, until softened, about 20 minutes. Test with a sharp knife or toothpick. They should be very easy to prick through.
  • Use a large deep pot. Add 1 liter of boiling water with the rock sugar. Bring it to boil. Add pandan leaves. Reduce heat to simmer for 10 minutes. Pour in coconut cream. Once it boils again, drain up and discard the pandan leaves. Add the sweet potatoes, black-eyed beans, tapioca pearls. The rock sugar should be dissolved completely. Taste and add more sugar if needed. Served hot. Or let it cool down and chill in fridge if you like it served cold.

Notes:
  • The consistency of every brand of coconut cream is very different. You can adjust the amount to your liking.
  • Choose different colours of sweet potato to make this dish more colourful and attractive. The diced sweet potatoes will turn black if they are not cooked immediately. Soak them in water to avoid from turning black in colour.
  • You can put the diced sweet potato in water to cook until softened instead of steaming. But beware that the purple sweet potato will turn your sweet coconut soup into purple. That’s why I used steaming.

Read More

Smoky BBQ Pork Ribs (Instant Pot with Slow-Cooked Effect + Video)

by · 7 comments

Craving tender, fall-off-the-bone Smoky BBQ Pork Ribs but short on time? You don’t need to spend hours stoking a smoker or patiently watching an oven to achieve rich, slow-cooked bbq spare ribs. By using a smart pressure cooker technique finished with a quick flash in the oven, you get maximum flavor with minimal effort—making this fast pressure cooker dinner a complete game changer for weeknights and weekend gatherings alike.


Smoky BBQ Pork Ribs Instant Pot01

Cooking with modern efficiency frees up valuable time for life's moments while keeping your kitchen cool and serene. By pairing a high-pressure braise with a brief high-heat broil, the meat locks in moisture while absorbing a deep, caramelised smoky bbq glaze. It is a wonderful way to serve up nourishing, restaurant-quality comfort food that invites family and friends to gather round with grateful hearts.


Why You'll Love This Recipe

  • Fast & Foolproof: Cuts down cooking hours to under 45 minutes using the pressure cooker.
  • Authentic Slow-Cooked Texture: Pressure cooking softens the meat to perfection before crisping under the broiler.
  • Rich, Caramelised Glaze: Reducing the cooking liquid creates an insanely delicious sauce that clings to every bite.
  • Stress-Free Prep: Streamlined cooking steps give you back time to spend with loved ones.

Smoky BBQ Pork Ribs Instant Pot02

Key Tips for Success

  • Peel the Membrane: Removing the paper-thin membrane from the bone side allows the rub and sauce to penetrate evenly and keeps the ribs tender.
  • Deglaze for Extra Flavor: After browning the meat on the Sauté setting, use a splash of Shaoxing wine to lift up those golden caramelized bits at the bottom.
  • Reduce the Sauce: Always simmer the remaining pot juices on Sauté mode to thicken it into a glossy, concentrated barbecue glaze before brushing.

Smoky BBQ Sauce


Smoky BBQ Pork Ribs Recipe

(Printable recipe)
Course: Pork, Bakery
Cuisine: Western
Prep time:
Cook time:
Yield: 3 to 4 serves

Smoky BBQ Pork Ribs Instant Pot03

Instant Pot available at Amazon: 
  • If you're interested in getting an Instant Pot, here's the info for you. I got it from Amazon (UK) as the model for sale in UK, with 220 volts, suitable for using in Australia.
  • If you’re living in US or any countries with 110~120 volts electrical system, the model listed on Amazon (US) is the one to go for.

Ingredients:
  • 680 gm pork spare ribs
  • ½ tsp salt
  • white pepper, to taste
  • 2 cloves garlic, roughly chopped
  • 3 Tbsp Shaoxing wine
  • ½ cup smoky BBQ sauce
  • ½ cup water
  • 1 Tbsp honey

Smoky BBQ Pork Ribs Instant Pot Procedures

Method:
  1. Remove the membrane on the back of the spare ribs. You can use a sharp knife to slice the corner first. That makes so much easier to get started to pull the membrane up with your fingers. Check the video on this post and you'll see it's not that difficult. By removing the membrane, the pork meat will absorb the flavours easily and become tender quickly. Season with salt and pepper on both sides.
  2. Prepare your Instant Pot. Press “Sauté” and heat oil until the word of “Hot” displays. Brown both sides in batches as the pot is not big enough. Put back all the pork ribs.
  3. Add garlic. Sprinkle Shaoxing wine. Add smoky BBQ sauce, water and honey.
  4. Close the lid with steam release handle pointed to “Sealing”. Select “Meat”, high pressure cooking for 25 minutes. Natural release for 10 minutes. Press “Cancel”. Quick release. Remove the lid. The pork ribs are already tender at this stage. Carefully transfer the pork ribs onto a baking pan lined with wire rack.
  5. To prepare the sauce: Select “Sauté” and cook the sauce without a lid until thickened, about 8 to 10 minutes. Brush the pork ribs with the thickened sauce. Grill in preheated oven at 180C / 350F until lightly brown. It's done. Drizzle more sauce on the ribs when served. It's very delicious!

Notes:
  • Heat your Instant Pot hot enough, then add oil to coat the bottom evenly. When you see “Hot” code displays, pan-fry the pork ribs. They shouldn't stick to the pot. You'll find some brown bits stuck to the bottom of the pot. No worries. The brown bits are very delicious. You can deglaze the brown bits with the Shaoxing wine and easily get up all of them.
  • You can quickly reduce and thicken the sauce by using “sauté” function in a few minutes. The flavours of the sauce will be intensified.
  • After high-pressure cooking, the pork ribs are tender enough. By doing one more step, broiling them in an oven with sauce on rib surface, it helps more flavours penetrate into the meat and give them a BBQ feel and look.


Read More